How to Create a Drawing in Autocad

Top 12 Tools to create drawing in AutoCAD
Introduction of AutoCAD
AutoCAD is a computer supported design and drafting software which developed and published by Autodesk. It is used for 2d design, 3d design, drafting and photo realistic rendering. Many Architects, Civil engineers, Mechanical and Interior Designers use AutoCAD for their designs purpose and floor plans.
All AutoCAD files save in DWG file format. Through this file format we recognize the AutoCAD files.

Top 12 Drawing Tools in AutoCAD
There are many tools that helps to start a drawing in AutoCAD. Below we have described only top twelve tools which are necessary to know while your AutoCAD training. Let's have a look at these.
- Line
- Rectangle
- Polyline
- Circle
- Trim
- Extend
- Copy
- Mirror
- Rotate
- Eraser
- Offset
- Move
Let's have a look on complete explanation of these tools with appropriate examples:
1. Line
Shortcut Key: L
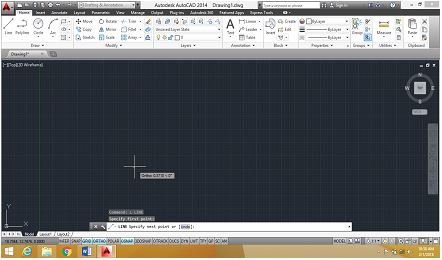
Line command draws a straight line from one point to another. With the help of line, we can create numerous line segments. All segments are separate to each other. Below points are describing the process of line:
- Go to the draw panel
- Click on line tool or enter its short command L

- Click a point anywhere on screen

- Then specify a value of distance and press double enter

- If you want to create a line segment, click each time to specify a new point from previous point
Like as:

Note: For straight line, ortho and osnap should be on.
2. Rectangle
Shortcut key: Rec
Rectangle command is used to create rectangles by two opposite corners. Below points are describing the process of rectangle tools:
- Go to the drawing panel
- Click rectangle tool or enter short command Rec

- Click a point anywhere on screen
- Enter D (for distances)

- First give value to specify the length and press enter

- And then give second value to specify the width and press enter

- Now we got a rectangle.

3. Polyline
Shortcut key: Pl
It's a single object that is composed by line and arc segment. All segments are connected to each other. Below points are describing the process of polyline tool:
- Go to drawing panel
- Click polyline tools or enter short command Pl

- Click a point anywhere on screen

- Enter L for length

- Then give a value for length and press double enter
- After this process your polyline will have created.
Note: You can also enter W and give any width of line.
4. Circle
Shortcut key: C
It draws a circle to the radius and center point. Below points are describing the process of circle tool:
- Go to the drawing panel
- Click on the circle tool or enter short command C

- Click a point on screen

- Enter R(radius) or d (diameter)

- Then give a specify value and press enter

- Through all given steps, your circle will be making.

5. Trim
Shortcut key: Tr
It is used for cutting unwanted line and edges. We have described the process of trim tool below:
- Go to modify panel
- Click on trim tool or short enter command tr

- Select the object ( clicking right button of mouse) and press enter

- Then click any edge, if you want to remove and press enter

6. Extend
Shortcut key: Ex
Extend command is used to meet two lines or edges. Below points are describing the process of extend tool;
- Go to modify panel
- Click extend tool or enter short command Ex

- Select object ( clicking right button of mouse) and press enter

- Then click this edge which you want to extend and press enter

- After doing this your selected edges will extend

7. Copy
Shortcut key: Co
- Go to modify panel
- Click copy tool or enter short command Co

- Click right button of mouse
- And Select the object

- Press enter
- Click on base point of anywhere like midpoint and corner point

- Give a displacement value and press enter
or
- Put object the other side ( Pressing right click of mouse) and then enter

8. Mirror
Shortcut key: Mi
It is use for mirror of any object to specify a first point, second point (XY axis) of mirror line. Below described the process of mirror tool;
- Go to modify tool
- Click on mirror tool or enter Mi command

- Click the right button of mouse and select object
- Press enter
- Click on the base point of object

- And click second point in a straight line (Bottom end and lower end of line)

- Then press enter
- And your mirror copy image will be creating on the other side.
Like this :

9. Rotate
Shortcut key: Ro
Rotate command or tools are used to rotate any object around a base point and on certain angle. Below described the process of rotate tool;
- Go to the modify panel
- Click on rotate tool or enter Ro command

- Click the right button of mouse and select the object
- Press enter
- Click a base point
- Give an angle for rotation and press enter
- Through all above process , your object will be rotating on a certain angle
10. Eraser
Shortcut key: Era
If you want to remove or delete any object from drawing, Eraser tool would be a perfect option for you. Below described the process of Eraser tool;
- Go to modify panel
- Click on the eraser tool or enter Era command

- Click the right button of mouse and select the object
- Press enter
- Then delete or erase your selected object
11. Offset
Shortcut key: Off
Offset command is used to give a certain distance to lines and circles. Below described the process of offset tool;
- Go to modify panel
- Click on the offset tool or enter short command off

- Give a specify value of distance and press enter
- Click the right button of mouse and select the object or line
- And again click the second point
- Now your line or object will have a replace or copy according to certain value.
12. Move
Shortcut key: M
Move command is used to move any object to the other side in a specialized distance. Below described the process of move tool;
- Go to the draw panel
- Click on the move tools or enter short command M

- Select the object and press enter
- Click on the base point and move objects in any direction
So, these are some important tools in AutoCAD which are necessary to know for every CAD user whether the person is an architect, civil engineer, or a mechanical designer. I have introduced you with top twelve tools which help to start a drawing in AutoCAD.
About Author
Hi, I'm Shipra Mishra exploring Architect Interior Master course at CAD Training Institute. You are free to leave your comments and suggestions regarding the blog in below given comment box.
Thanks for reading…
Source: https://www.cadtraininginstitute.com/top-12-twelve-tools-to-create-drawing-in-autocad/
0 Response to "How to Create a Drawing in Autocad"
Post a Comment